How-To Install the Solo Seat Cowling for BMW K1200RS

Our solo seat cowling was designed to be used ONLY with the stock K1200RS seat. It will NOT fit the Corbin, Sargent, Meyer, Russell, GT, or even the Comfort seat. Comprende? Good... Installing your Pirates' Lair Solo Seat Cowling is pretty much a no-brainer by design, but if done improperly, you could either lose it, or damage your seat, or damage your expensive paint finish on your cowling. If you follow my anal guidelines, you will minimize any possibilities for problems arising. Just learn to do it right and then follow the same procedure every time. Note: Please read disclaimer at bottom of page. If you don't know a qualified paint person, we would be glad to refer you to one that we trust. He's reasonable, honest, and a fellow rider who does nothing but paint BMW motorcycles. Call us at 314.647.1320 CST

Enclosed in K1200RS Solo Seat Cowling Kit:
1. (1) Unpainted Solo Cowling for Stock K1200RS seat
2. (1) 6 x 6.5 galvanized metal plate
3. (4) Rubber coated metal hooks attached to (2) Cordura Straps
4. (1) 13" Rubber protective edging

First Things First: Installing Your Protective Edging:
While all edges on the K12 solo cowling are smooth as Brittany Spears butt, constant on/off friction may cause long term material damage. A baaaad thing. As I'm not going to let that happen, every solo cowling 
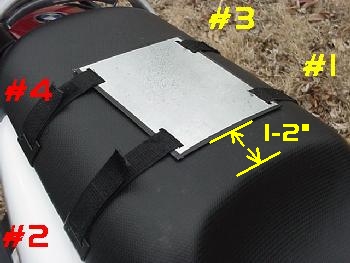
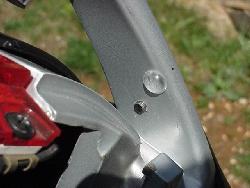
sold will come with a 13" piece of rubber edging to be used on the front edge. I strongly advise customers to use it. If this edging is installed and used properly there should NEVER be any seat damage. Choose not to and the results may be painfully obvious after a few weeks or months. Note: Only the front edge cowling edge is a threat to the seat material. Trim as needed.

Attaching Your Cowling Bra:
If you are right handed, with your bike on the centerstand, stand on the right side of the bike for install.. or not. You'll notice that one of the two bra straps is longer than the other. This long strap will go towards the front of the bike. The short towards the rear of the seat. Make sure that the strap is positioned on the UNDERSIDE of the plate when installed.

1. Clean your seat before install of bra. Armor-All is perfect or Plexus. If dirt or debris gets caught underneath the bra it may act as an abrasive and scratch seat material. Not good.

2. Position your rubber clamps in 1-4 order.. (pic at right) so that your front strap is secured about 1-2" back from the seat hump. Secure the front strap first making sure the metal plate is centered.

3. Position and secure the rear strap. Everything should be smooth and balanced.

Installing Your Cowling :
OK.. you should still be standing on the right side of the bike. We are going to install the cowling from REAR to FRONT. The trick here is to center the cowling at the very rear making sure that you have clearance between your cowling and the grab bar. . This is crucial.

1. With your hands on BOTH the left and right side of the cowling,, fingers tips flush with the lower cowlings edges*, position as shown with at least 1/4" space between the cowling and your grab bar. The cowling was designed to fit snugly against the seat like a glove on OJ.

2. When you think you have it positioned correctly, apply EVEN PRESSURE to both sides and you'll feel the cowling slide down over the rear rubber clamps and onto the seat.

3. The rear is in place.. now the front will snap into place with little effort. Position your hands again with your fingertips along both FRONT edges. Adjust accordingly so that you have equal spacing between the cowling and the body panels on both sides. That's it!!


* The reason for having your finger tips along the bottom of the cowling edging during install is for spacing reasons. For a balanced visual effect, the cowling must have equal spacing between the cowling and the body panels on both sides. Also.. if you have too much space on one side, your cowling may come into contact with the body panel.. not good. Use common since.


Safety Precautions :
In all the miles of testing done in the prototype phase, no cowling that I am aware of has moved or changed position. However, somebody in the future will either back up against theirs or hit a moon-crater sized hole and make the cowling slide back making contact with the grab rail which could do minor damage to your expensive paint finish

In an effort to cover all theoretical problems... we have enclosed with every Cowling Kit either clear peel and stick vinyl bumpers (similar to seen in this pic) or something similar to be attached to the inner side of the grab rail as shown.

FYI.. should you lose one of your bumpers, they can be purchased at many home decorating places for about $3 a pack of 16. I get mine from Home Depot by Shepard Hardware Products. Package says "Surface Guard" 3/8" Self Adhesive Vinyl Bumpers Part # 9964S

DISCLAIMER: At the time of this writing, long term effects as to seat-to-cowling contact is unknown. My recommendations are as follows... Always make sure your seat is clean before bra install, Always REMOVE your cowling when NOT in use, and Always REMOVE your bra when cowling is NOT on the bike. This would (in theory) assure that your seat remains pristine. As you have been warned properly, please don't expect Pirates' Lair to buy you a new seat in six months if you disregard these suggestions.