

|
|
|
| The following was sent in by two K1200S owners who did the install and took the time to send us his tips and recommendations. It sounds like both knew what they were doing. We appreciate their time and effort in volunteering the following tips. Do keep in mind that the opinions shown below are NOT the ONLY route (or the best or the smartest way, although they could be) to get the desired results. The following are only opinions of how to do the Verholen K1200S or K1300S riser install.. followed by some feedback sent in by a few of our quasi-esteemed customers. |
| K1200S
Handlebar Risers Install by Jason Dellinger This install was completed by myself and another mechanically inclined friend in about 2 hours. I would like to share with you some notes that you may want to pass on to other customers. I would consider this an advanced level install and would encourage others less inclined to have a dealer perform this service for them as it involves removing the throttle assembly and the brake and clutch assemblies. I will do this for local customers (I live in Belmont, NC) for $100 (see appendage info below) It helps to be extra careful as there are some very small screws that hold the switch housing covers in place and they are not easily replaced if lost (no we didn't). It is actually easier NOT to tie the clutch and brake levers back as they put stress on the mounting bolts and in effect spring-load the assembly. The left bar riser is smaller than the right when installed in the factory bar mount. However, there was not a problem with clamping when both bolts are tightened equally and evenly. The bolts should be tightened incrementally switching back-and-forth between each fastener until the proper torque is reached. Also the problem with the left grip set screws and a loose left grip is because people are using too large a drill bit. The factory screws are self-tappers and need plenty of material to engage, especially the new aluminum bar risers. The drill bit size used was .125 or 1/8". It is important that the hole be drilled deep enough to allow the screw head to seat firmly against the handgrip. If the hole is not drilled deep enough, the countersunk head will not seat and this will contribute to a loose left grip. We removed the right side plastic in order to access zip ties that had to be cut in order to get the required clutch cable free play. Care should be taken with the throttle assembly when the factory bar is removed and the new bar is installed. The throttle assembly can rotate in the the housing with no bar in place and when reinstalled on the new bar the throttle will not budge. Make sure the throttle turns freely before starting reassembly. An extra person is a huge help, especially when adjusting the bar angles and the control locations. You can hold the grips and controls in the preferred location while your partner tightens the screws. This would be extremely frustrating if done alone. Also, you need the extra hand to spot the drill locations for the left grip while you hold the controls in the desired location. I am very happy with this modification. It gives a taste of what the new (hopefully) K1200 based touring version will be like. I apologize for the long email, but I feel that this information would be helpful to anyone doing this install, even the all-knowing dealer. Remember, this is not a factory service and is new to everyone, including dealers. Thanks very much for the outstanding service. |
| Please
list the following for my contact information: Jason Dellinger Cell: 704-813-8602 Email: vettepilot@carolina.rr.com Please understand that this is my home email address and that responses may be delayed until the afternoon when I get home. Also, this is not a tech-support line. If someone decides to do the install on their own, they will have to wing it as I did (hopefully with the same results). Please check out our company website at your leisure: http://www.dellingerenterprises.com |
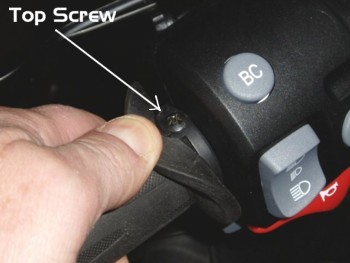
K1200S Handlebar Risers Install by Mitch Courte / Ft. Myers, FL I installed the risers today. I had the assistance of another person that has no mechanical experience, but I wanted to have another pair of hands. The installation took me 1.5 hours. The two holes to be drilled are on the left side handlebar. The left side handle grip assembly is a "one piece assembly", including the grip, and the switch housing. If you would look at your K 1200S, roll the handlebar grip back towards the end of the bar (only 1/4" - 3/8"), you will see a phillips head screw on the top, and one on the bottom. After these screws are removed, the grip assembly will slide off of the bar. There are no holes in the Verholen risers for this grip assembly, therefore the grip assembly must be put on the riser, and the two holes drilled through the holes in the grip assembly, into the riser. I used a 9/64" drill bit. 1. The two screws that hold the grilp in place are underneath the edge of the grip, (see pic at right) where the grip meets the switch housing. By gently rolling back the grip with a finger, you will see the phillips head screw. There is also one on the bottom side. There are two silver torx screws secuing the clamp for the clutch lever. These need to be loosened, but not removed. There is also two small torx screws holding the switch cover housing. |
 |
| 2. Drilling into the round bar was very easy. I started with a very small drill
bit at slow rpm's to get a pilot hole. I then switched to the 9/64"
bit. Very easy process. 3. The screw holes DO NOT need to be tapped. Just drill them deep enough for the screw. The two screws under the grip are self tapping screws. 4. I re-used the factory screws. No need to change them. This all sounds complicated, but if you look at your left hand grip, you will get a better idea of what I'm trying to say. |
|
Customer
Comments / Advice
|
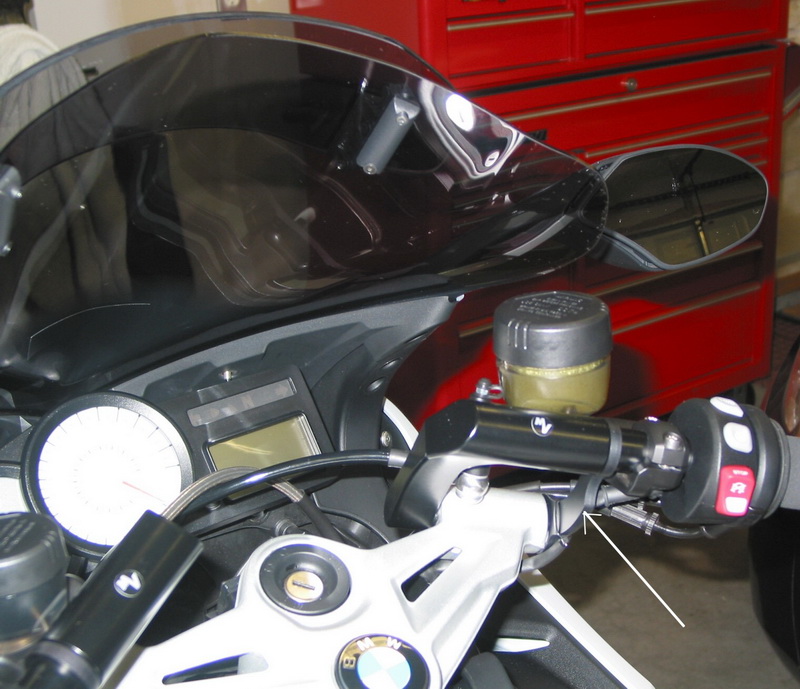
| K1300S Riser Install Tips & Comments: Got the Verholen risers on. It was not a bad install. The new kits with pre-drilled holes will be nice, but the installation of these was easy enough for someone with experience on things mechanical. No tapping needed, but two holes did need to be drilled - one on each side for the switches. The only tricky part was locating the holes rotation (circumferentially). Axial location wasn't a problem as I just came up the same distance from the end of the bar as the stock ones. The clutch line extension was easy to bleed once I took the control off and put it and the line on a 45 degree angle while tapping the line to encourage the air bubbles to go up. I think they were getting stuck at the metal elbow of the line end at the control banjo fitting. The extension piece works well. One will need extra mineral oil for the clutch bleed (get the 16oz size in case you have problems) and a bleed nipple for the clutch slave cylinder (the bike doesn't come with one - it's extra!). Of course, you need extra brake fluid for the brake bleed too. These brakes on the '09 are easy to bleed - no inner and outer brake circuits. You bleed them like regular brakes. Note from Pirate: I asked Paul about the new part that looks like a brace that comes with every K1200 and K1300 Kit. A few customers had asked me what it was for as the old kits didn't have this piece. His reply ..I had read where several people thought the risers flexed a bit. There is a longer lever arm without that piece installed - I think it is a support that will reduce flex. I know that the risers feel absolutely solid with it installed, but I didn't try them without that piece, so I can't compare how they would feel without it. Another comment - I wondered if there would be any more vibration with the risers being solidly mounted versus the stock K1300S bars that have the rubber damping feature. The bike feels as smooth now as it did with the stock bars. Although the install of the hardware came out good, the bike looked cleaner with the stock bars I think. Putting these on has made the difference between 1-2 hour tolerance versus all day comfort. At 60-80 mph there is just enough wind to take the weight off the forearms, and the more upright position is easier on the neck. The bike doesn't seem to want to fall into a slow turn like it did with the stock bars either. So I guess form has to follow function, and they work better for me than the stock bars. Mr. Paul Mortenson / 2009 BMW K1300S / Mulvane, KS |
| Just finished
150 fast miles with the new risers. MUCH more comfortable; now it's my bike.
Of interest (someone else also commented), probably because of posture,
I seem to be able to handle the bike better, with greater stability, both
fast (alright, only 90) and slow. BTW, the OEM screws from BMW are very
soft, thorough predrilling is critical. C. David Hunt, M.D./ BMW K1200S / Hoboken, NJ |
| I'm really
happy with the barbacks for the K1200S, they installed simply at the dealer
, and although at 6'2" I was marginally ok with the stock bars, my
wrists would ache a little after a few hours. The new ones are a great improvement. Ivan L. Gold / BMW K1200S / Portland OR |
| My K1200R install was the first one that BMW Fort Worth has attempted. So, yeah I
got raped on the install. About $400 in labor and $10 for some little one
time fasteners. I don't know if it really took them that long, the tech
was impaired or if they were getting me back for not buying that bike from
them. But all in all it's worth it. I can ride the bike now without the
neck pain. I was on it for a couple of hours today. It makes the bars about
like the angle on a R12RT. It feels like they came up three or four inchs.
Anyhow, I would reccomend the setup to older guys like me with neck/back
problems that act up when you do the crotch rocket crouch. Jess Hall / BMW K1200R / Fort Worth, Tx |